
Understanding Light in Landscape Photography Part Two: Direction of Light
I’m Brad Carr, and in Ten Thousand Hours, I share practical and technical articles to help you improve your landscape and nature photography. I also organise group workshops, creative retreats, and am available for private one-to-one photography tuition as well as online and in-person creative mentoring.
Hello, and welcome back to Ten Thousand Hours, the publication dedicated to helping you improve your landscape and Nature photography with technical and practical articles filled with insights and wisdom from my photographic journey so far.
Although I have made philosophical writings over at A Photographer’s Journal and in reputable photography magazines my speciality over the past few years, I am told that I have a real skill in writing these practical articles, too. I hope you manage to find something useful woven within my words.
In part one of this practical guide to using light in landscape photography, we looked at the different types of light that can be used to create emotive and evocative photographs. If you didn’t read that, I recommend clicking here to do so before you proceed with part two. Here in part two, we are going to look at the different directions of light that we can use and how each of them looks in a photograph.
Direction of Light in Photography
Front (Direct) Light
If you listen to some leading names in landscape photography, they will tell you that a photograph is only worth creating when the light source is over your shoulder and casting itself evenly across the landscape in front of you. But what about the darkness? I ask. Isn’t that an essential part of our human existence and, therefore, an essential ingredient within a photograph?
A front-lit photograph certainly has its place in landscape photography. Ultimately, however, I tend to find them a little lifeless because they generally lack mood, contrast, and some all-important shadows that help add depth and emotion. Here is an example of a rare front-lit photograph that I created in 2021, focusing on the textures of the lakeside trees and plants, as well as the tranquil water that is shimmering gently in the background.

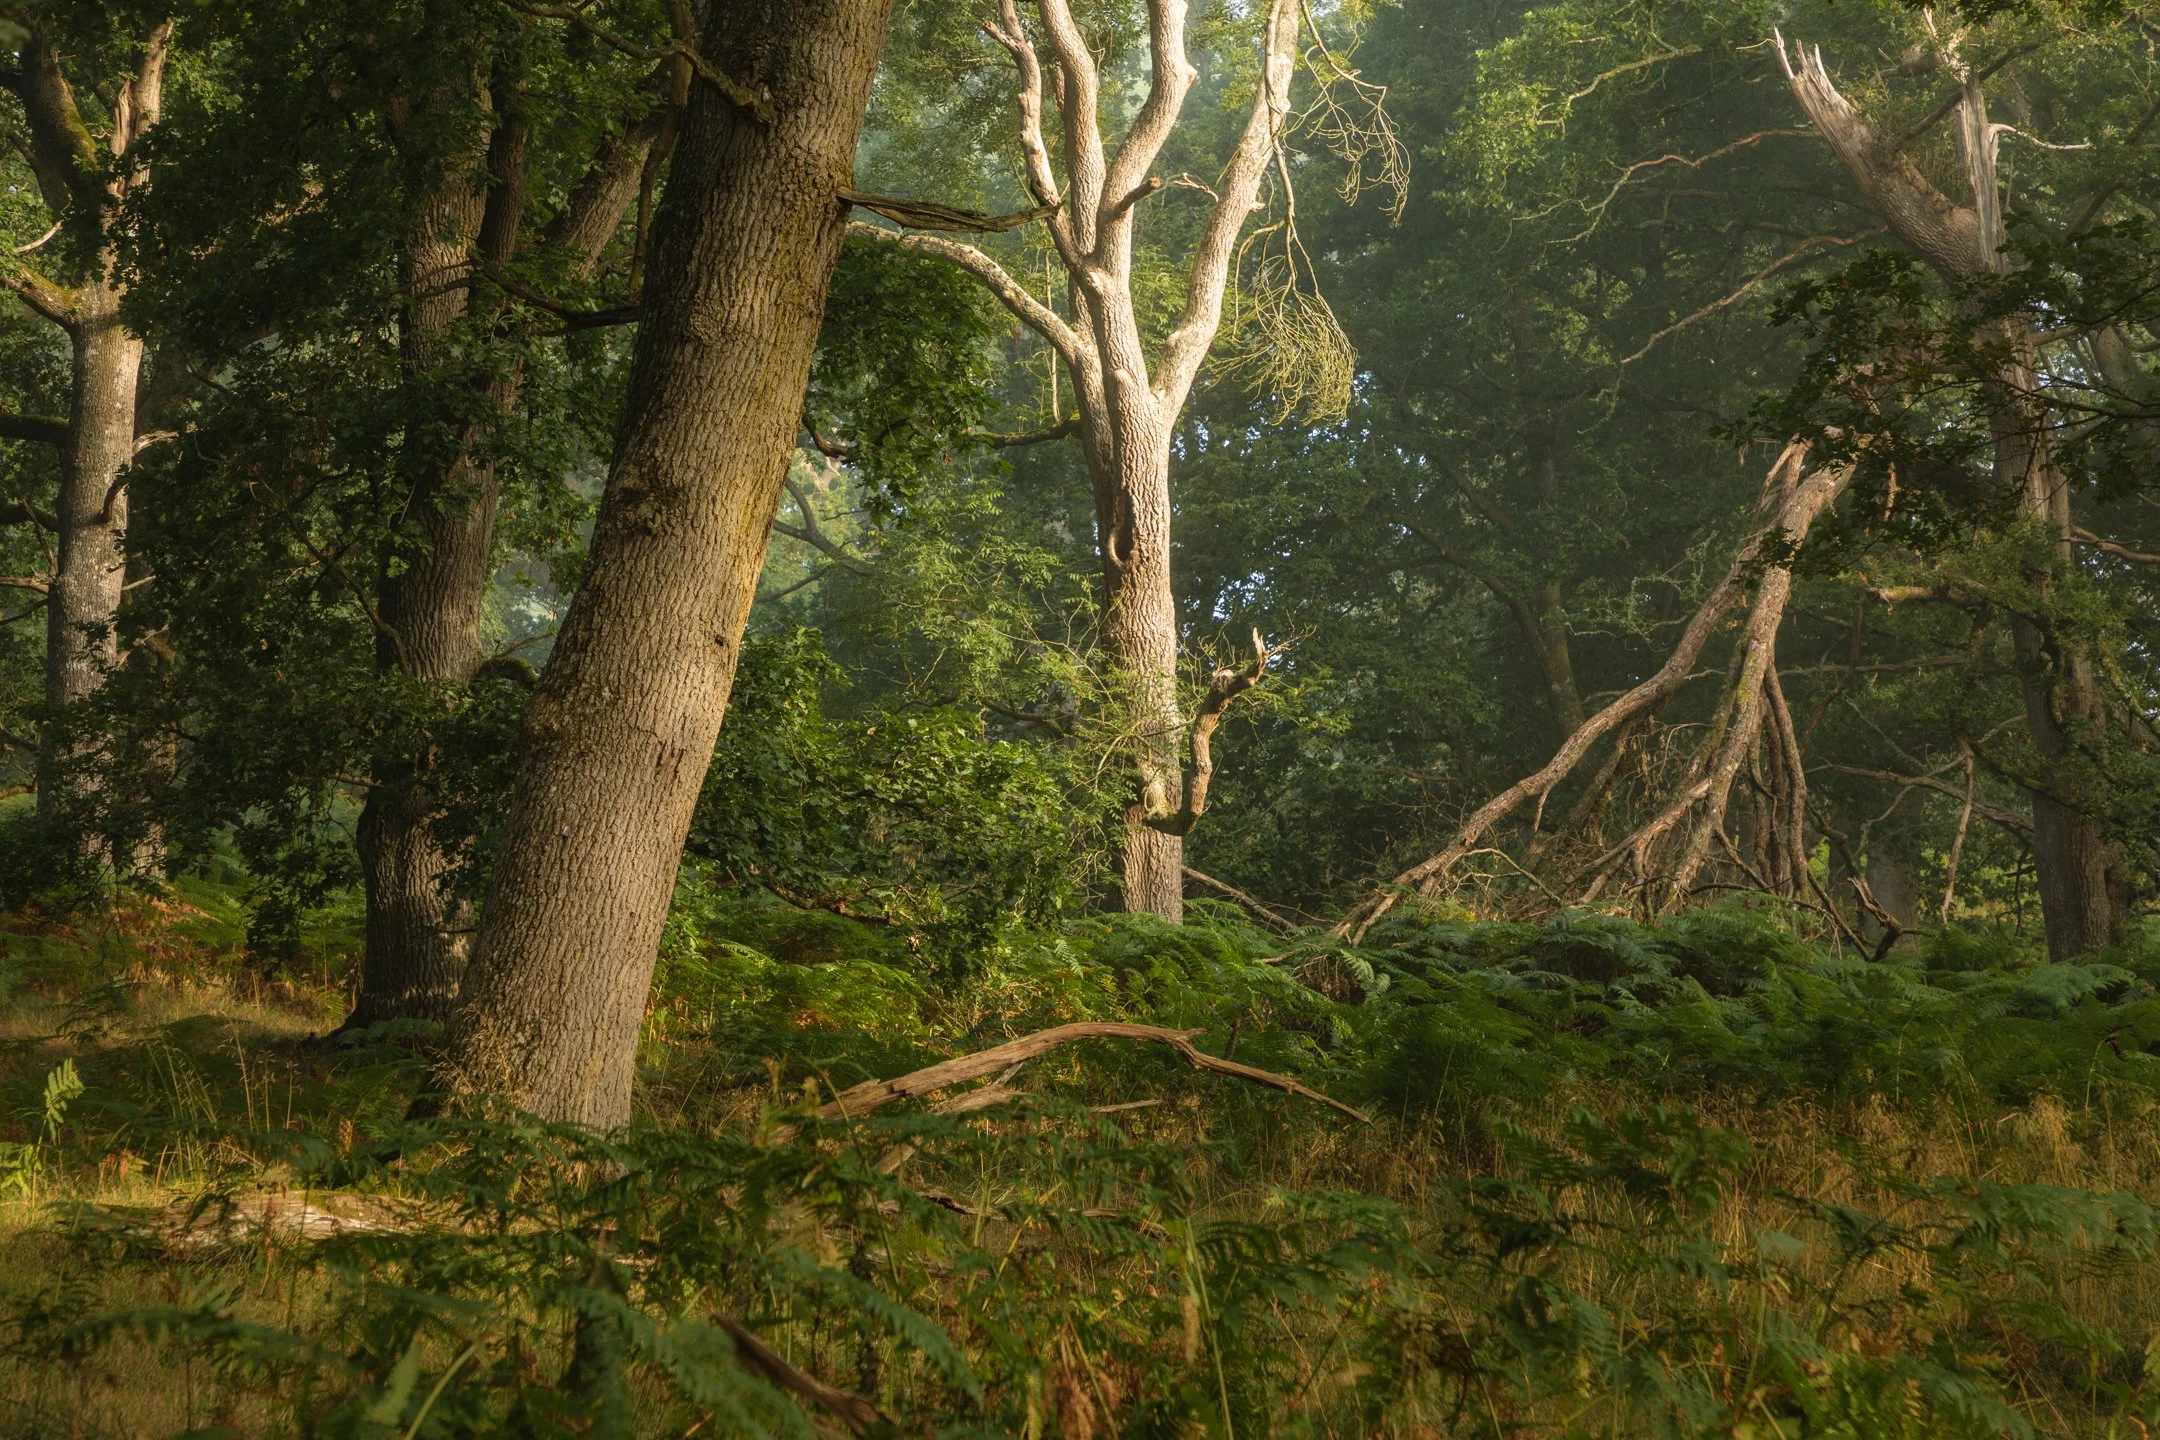
Below is a further example of how direct light can be used in a woodland environment. Though the sun had risen to a relatively high point in the sky, there was still a touch of mist in the air, which helped to diffuse and soften the light to make this photograph possible. If the mist hadn’t lingered, I think this scene might have been a little too bright to make a meaningful photograph. When used effectively, direct light can draw attention to key subjects in a photograph.
Back Light
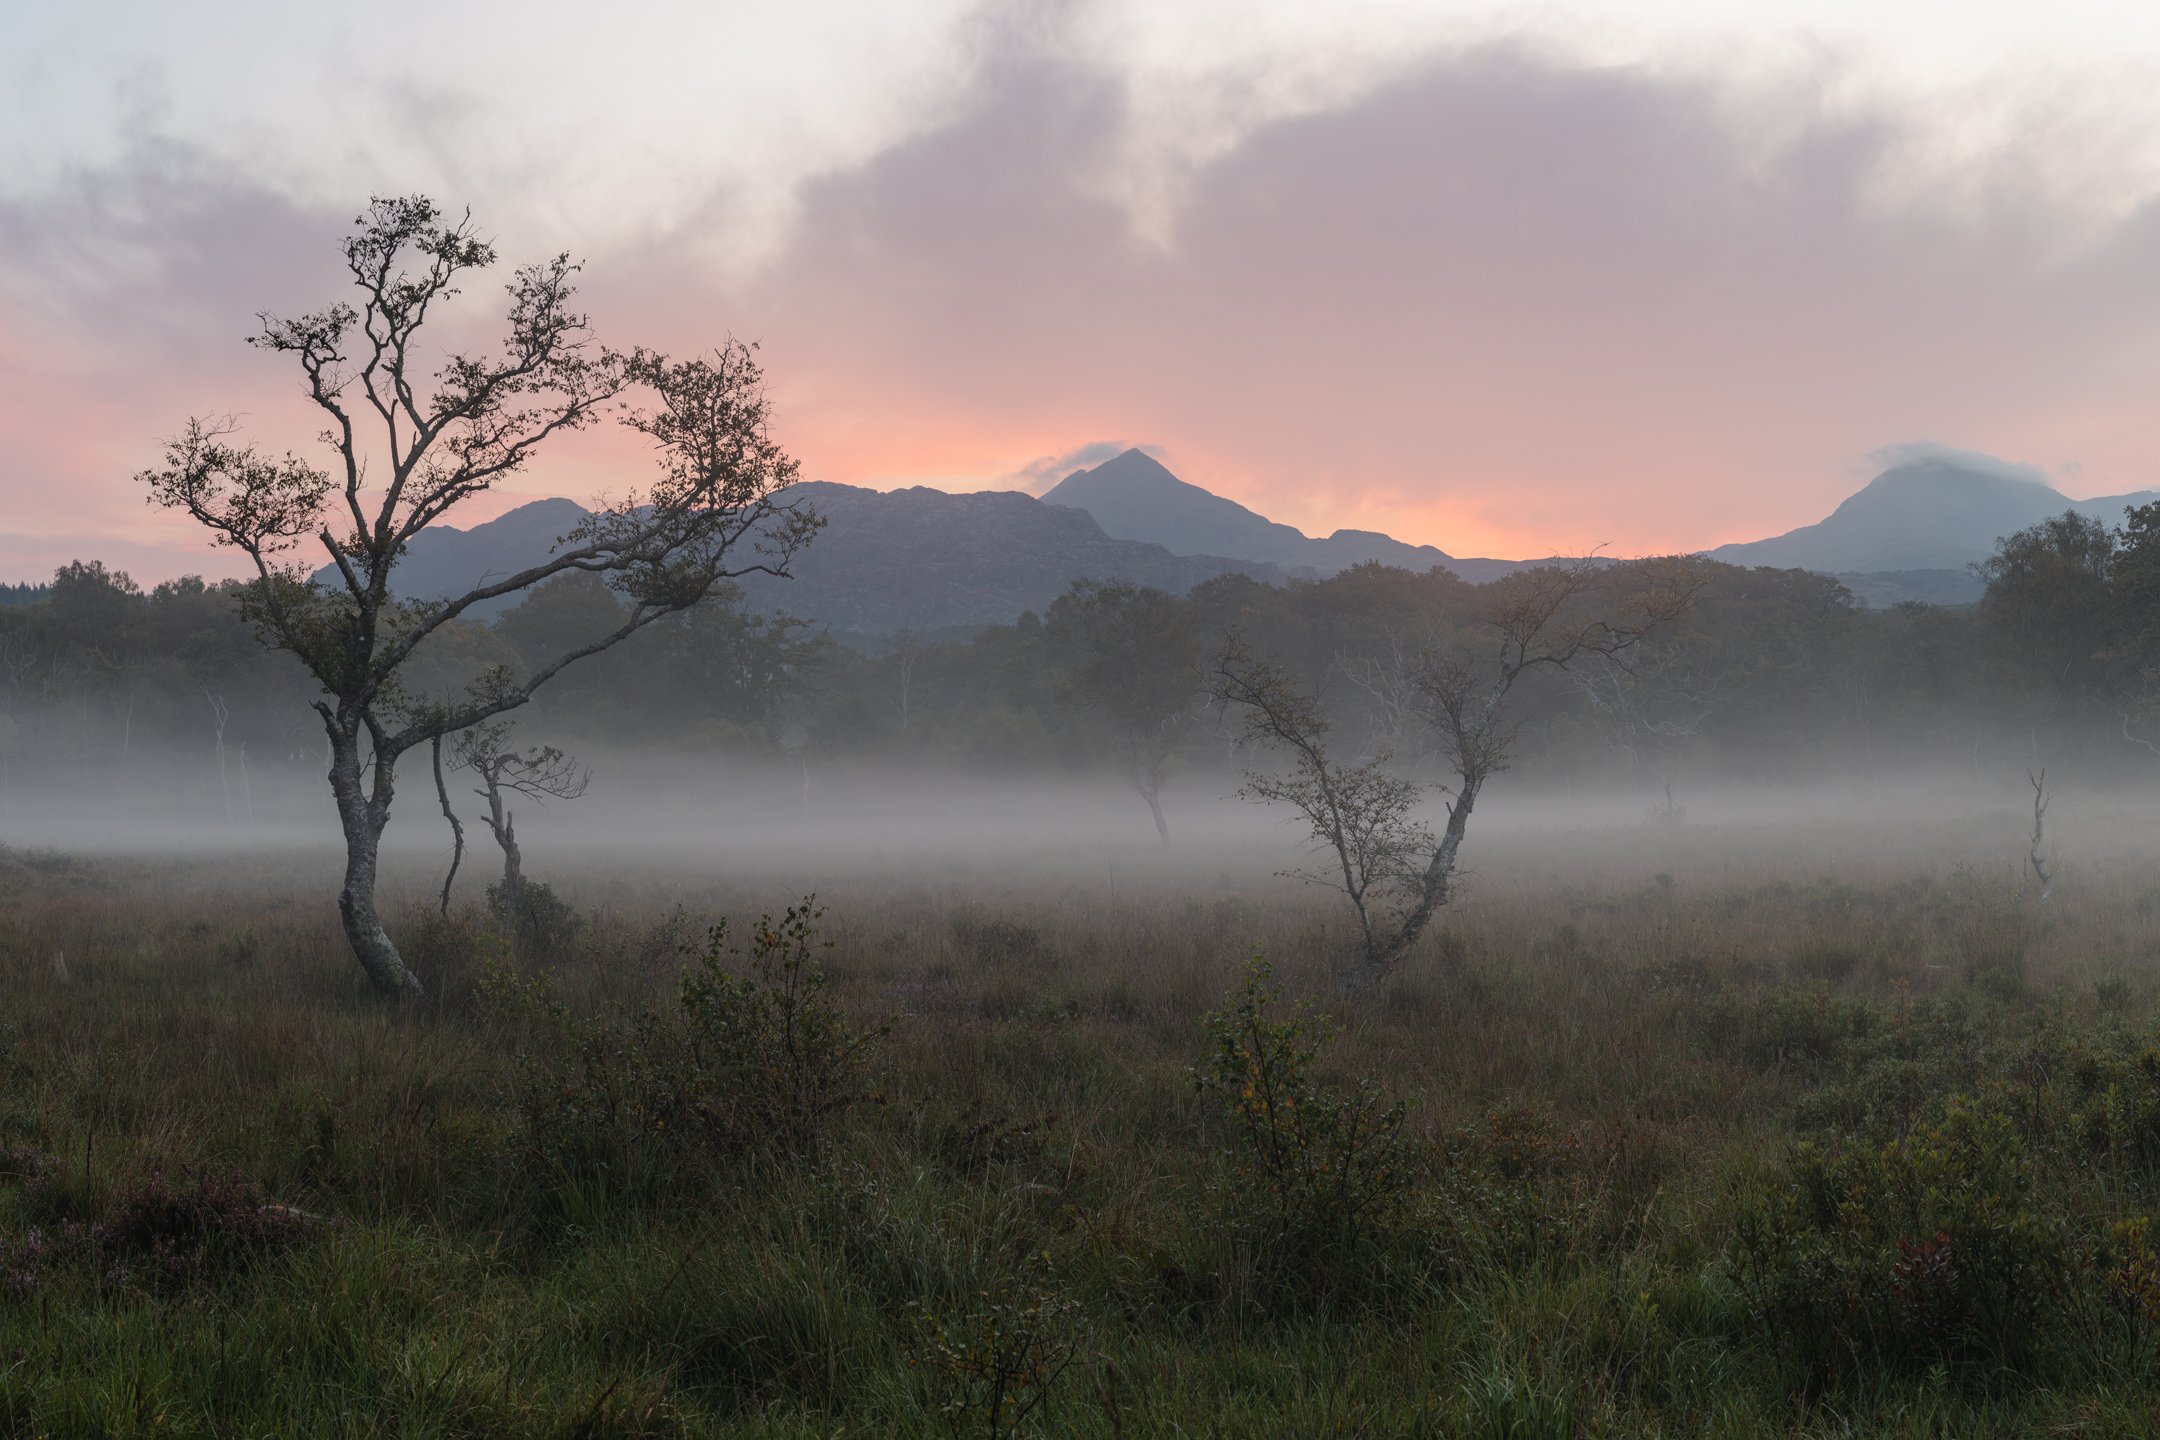
Backlight is, without doubt, one of my favourite kinds of light to use in my photography. The mood and emotion that is created when the light is behind our subjects is very difficult to replicate. Subjects, just like the mountains below, appear as silhouettes against the source of light, which can add a certain mystery to a scene and invoke spiritual-like qualities to a photograph.
In the example below, I used the backlight technique, ensuring that I created the photograph before the sun had risen over the mountains. This meant that there was no direct sunlight on the foreground landscape, which maintained its mystery and mood, as though the trees and mountains lay dormant in a post-apocalyptic landscape. If the light here had been shining straight into the lens, it would have been far more difficult to manage the exposure. The landscape itself would have also lost its subdued, evocative mood and mystical appeal.
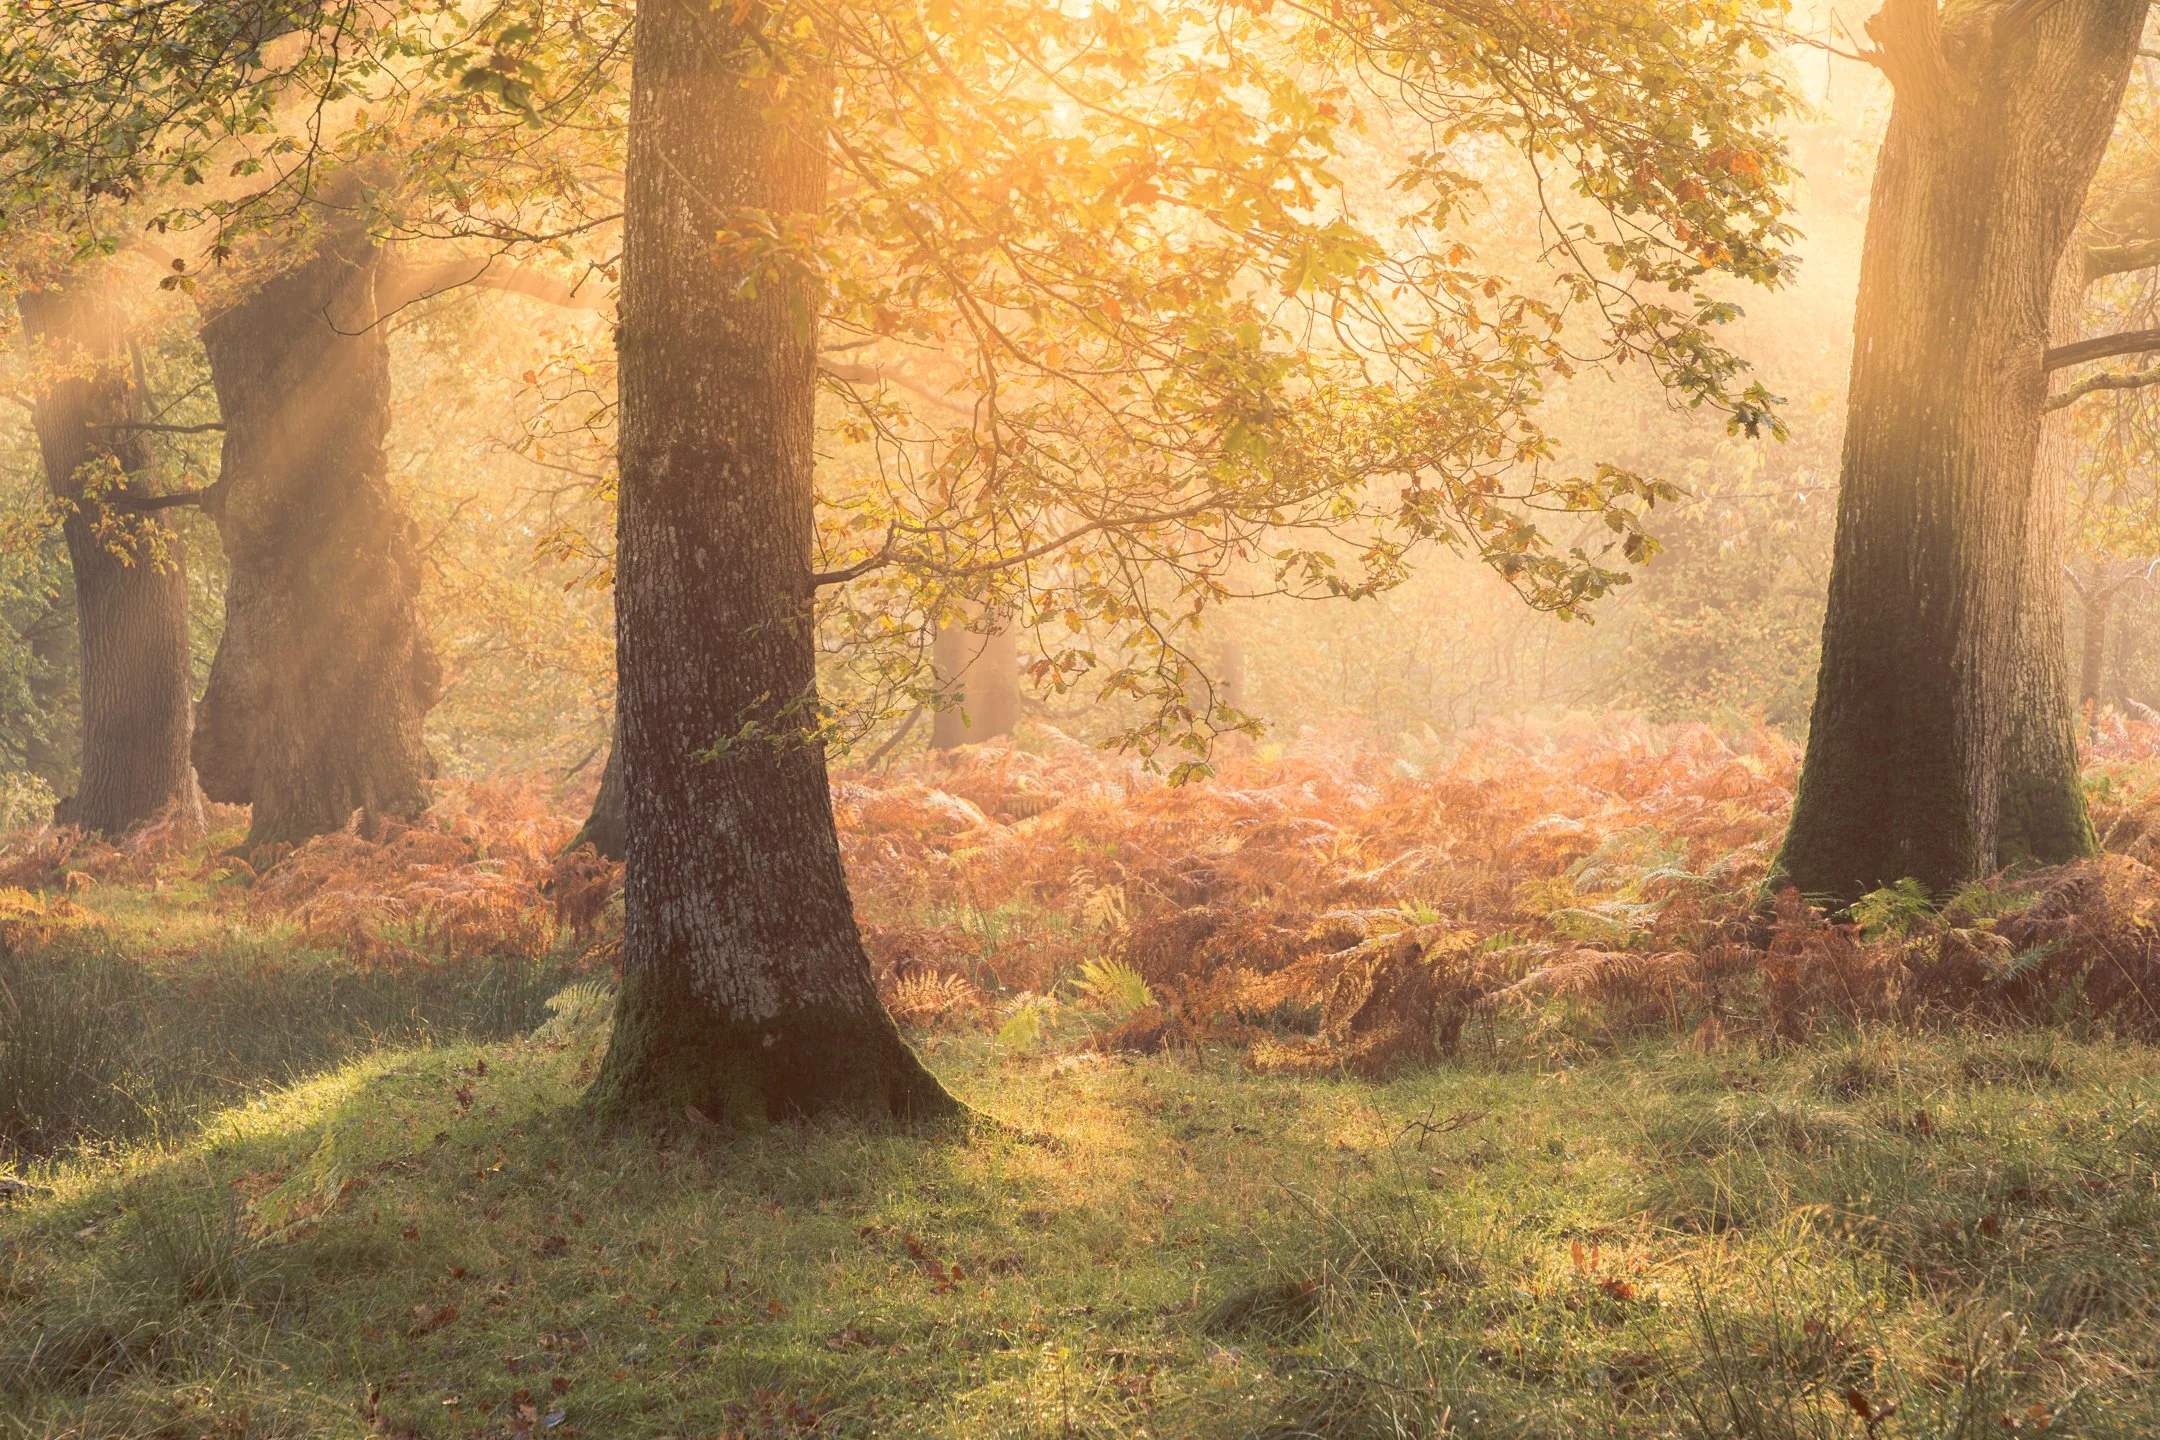
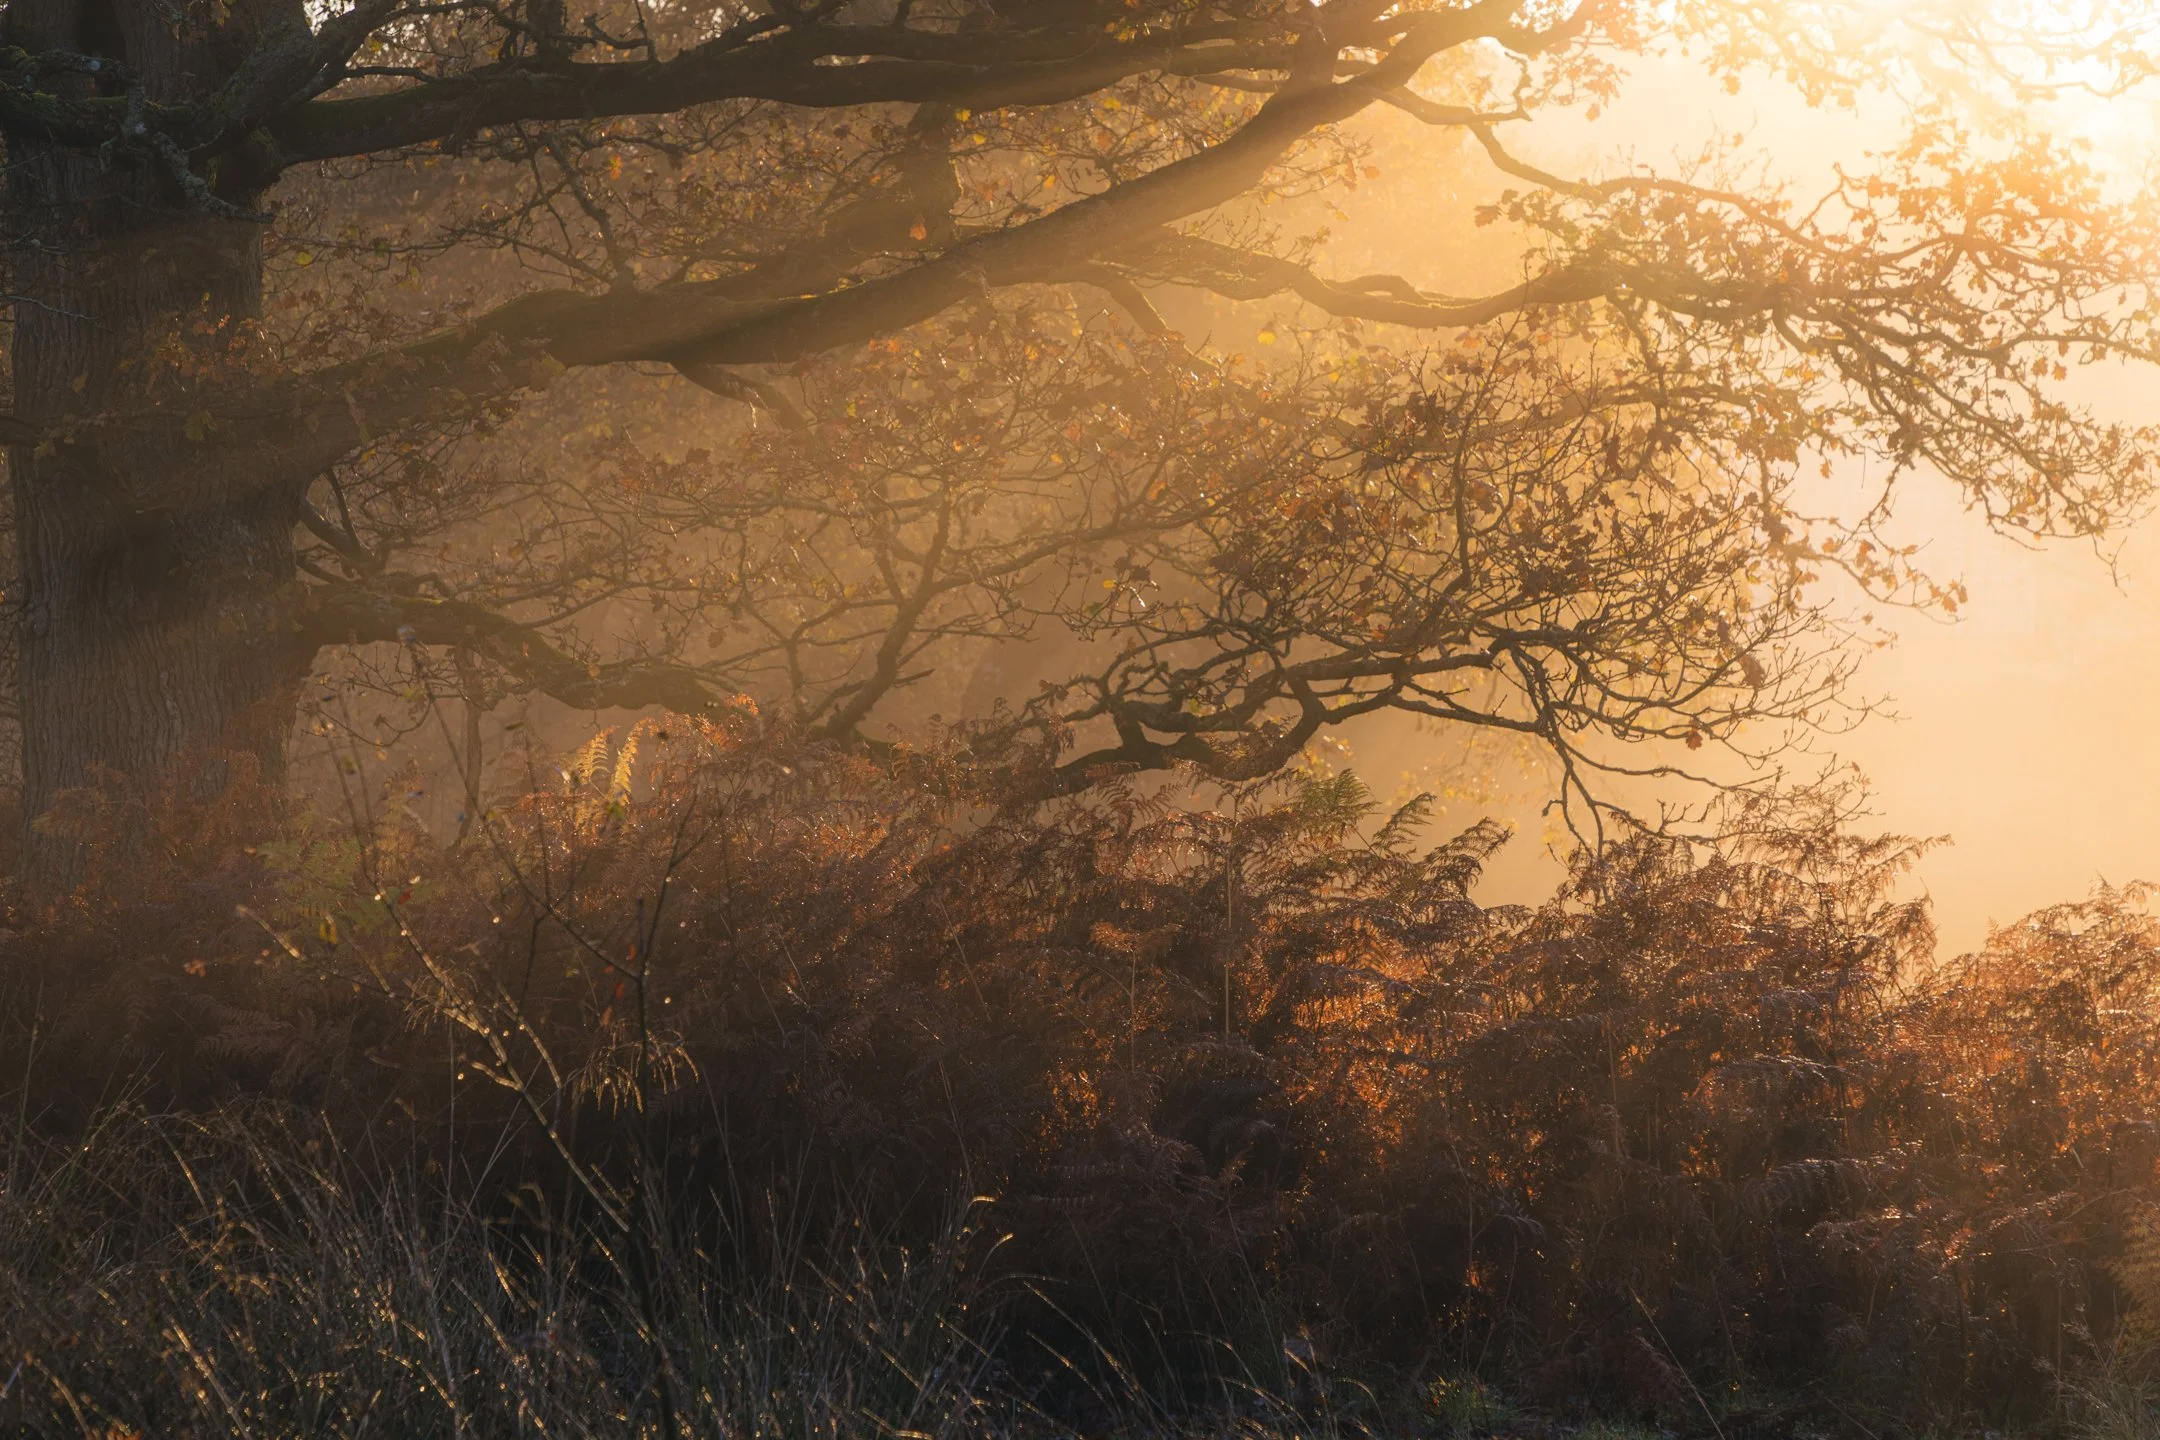
Backlight can also be used to powerful effect when the light directly interacts with our chosen subjects. Notice how the autumnal leaves of the oak trees above are alive with a soft glow created by the gentle morning sun, and the rays of light pierce the thin veil of fog to enter the woodland. These rays can be captured on foggy mornings when the sun has risen a few degrees so that it is slightly above us.
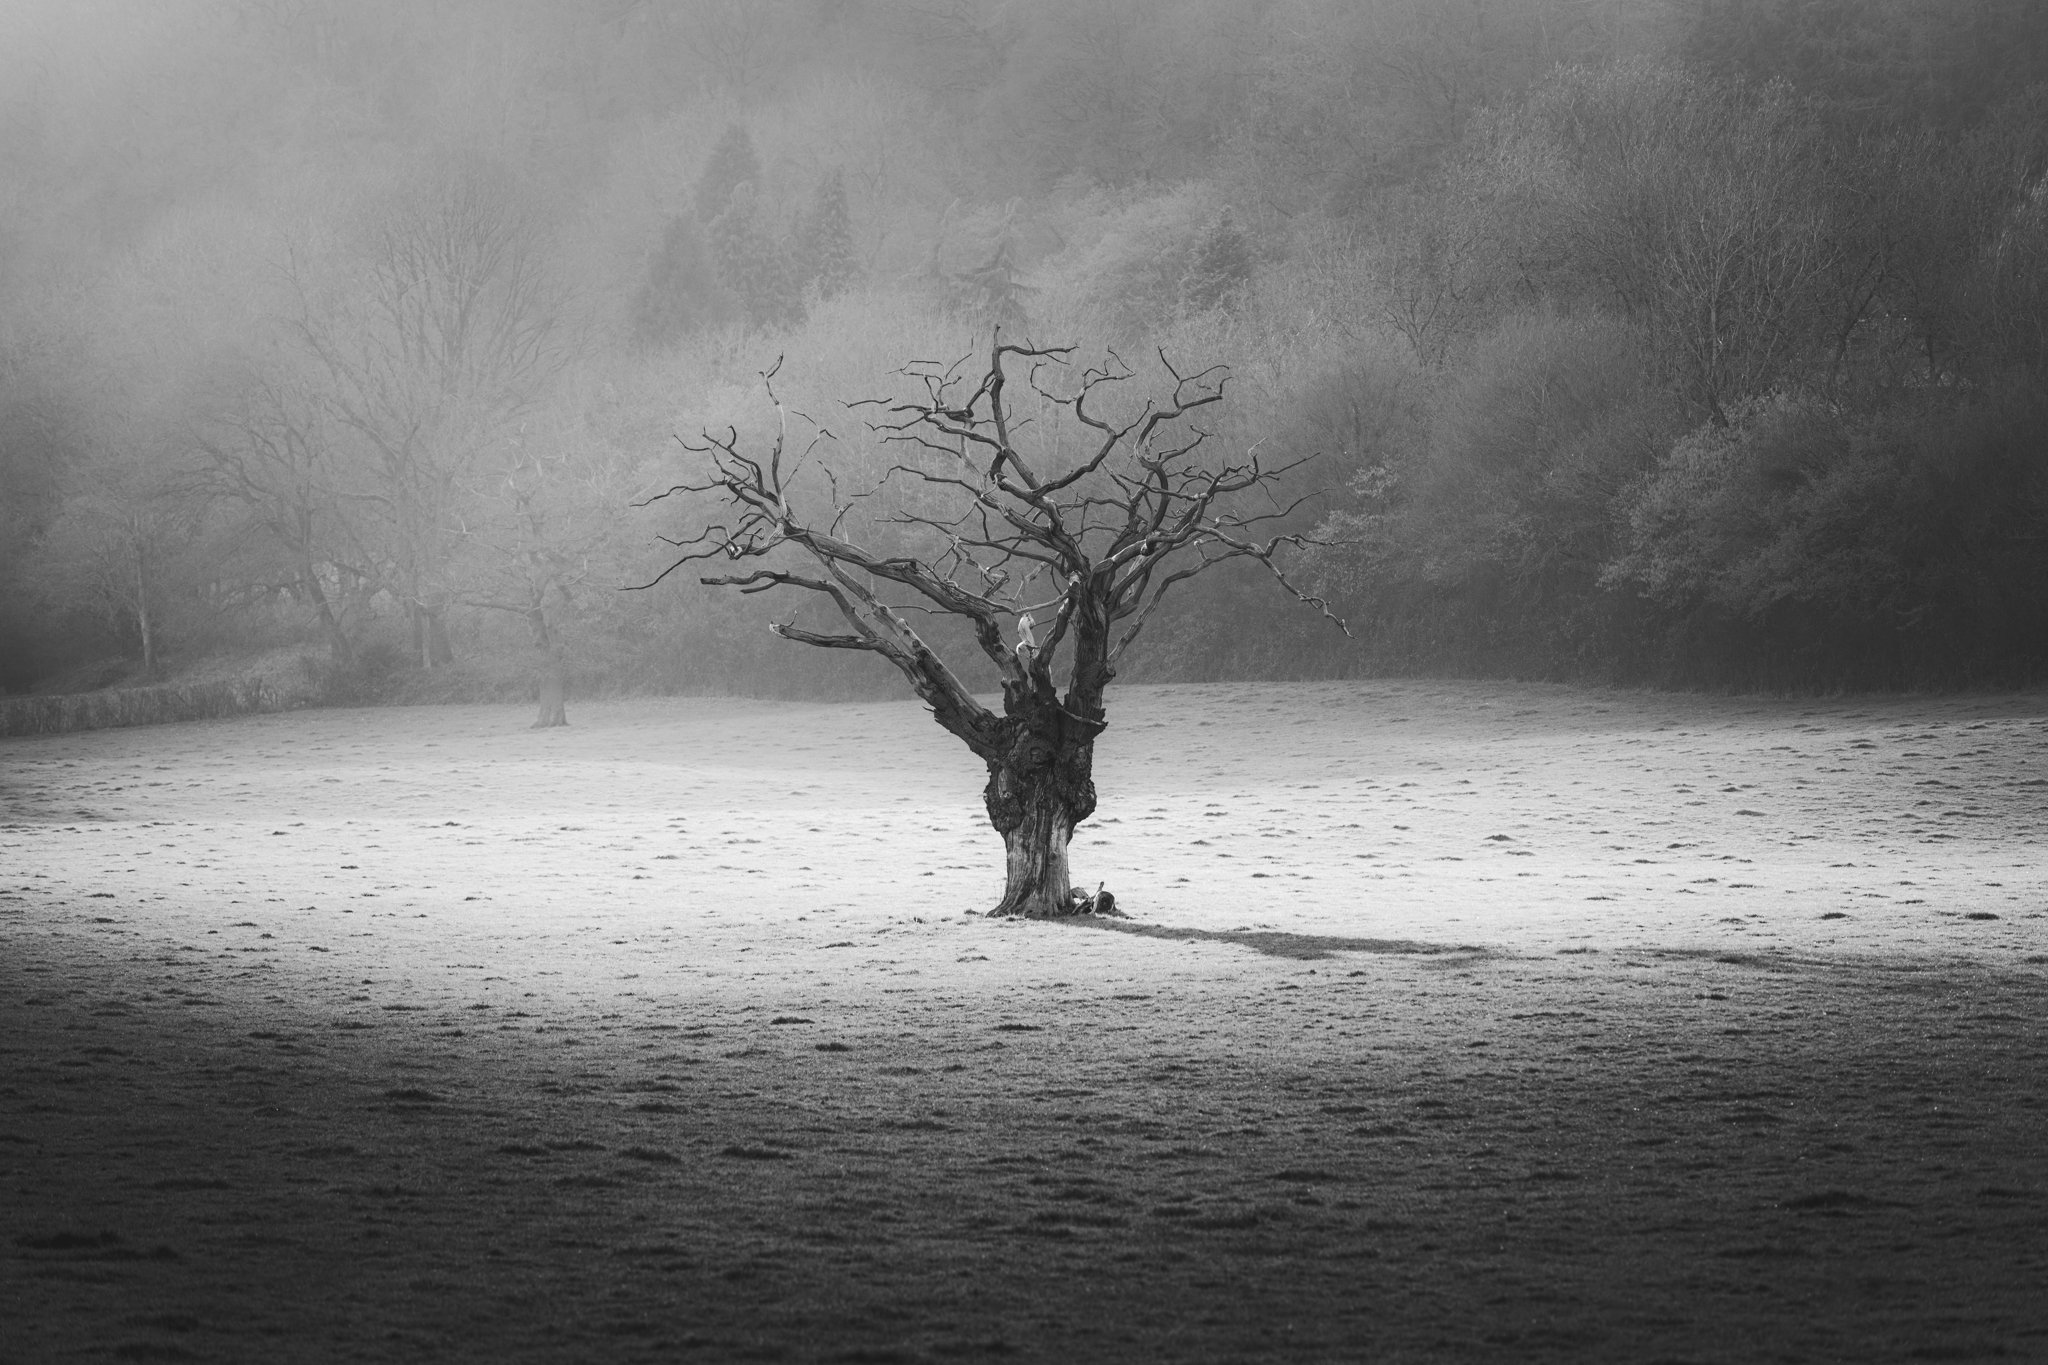
Sidelight
This kind of light can lead to some beautiful photographs. When using sidelight, we will often find a beautiful gradation of colour across the landscape. In the autumn and winter months, these colours are at their most beautiful. You can see in the example below how sidelight adds a three-dimensionality to photographs because it leaves some shadow detail on subjects like trees. Sidelight, therefore, helps to bring a photograph to life.

We refer to this as ‘shooting across the light’. It can be particularly impactful at the edge of a woodland. One of my primary thoughts when entering a new woodland environment for the first time is ‘where is the light entering?’ This can help my creative process as I begin to envision what the landscape might look like during different seasons and at different times of the day. Below, you can see how the softness of morning light enters from right to left, leaving the other sides of the silver birch trunks in shadow, and the woodland disappearing into the depths of darkness.
I am yet to photograph this landscape with what I would class as the ‘perfect’ photographic conditions of fog and golden sunlight on a frosty morning, but I have hopes that when I do, it is going to look truly spectacular and otherworldly.


FREE eBOOK!!
Receive your link to a FREE eBook Covering the Principles of Composition in Landscape Photography.
Sidelight & Backlight Combined
In my opinion, a photograph is completely transformed when we learn how to combine two directions of light, most notably sidelight and backlight. In the example below, you will see how golden sunlight gently merges with the icy blue fog to create the most sumptuous-looking autumnal scene. By placing the sun slightly behind my subjects and offset to the left, I have utilised what I believe to be the perfect kind of light in photography.

Here are some further examples of where I have used this style of magical light:


Above the Light
An often forgotten way to use light in photography is by getting above it. By shooting down onto the light, we can create some of the most glorious and atmospheric photographs. When combined with the ‘shooting into the light’ technique that I have discussed previously, you can end up with some beautiful resulting photographs, like I did when photographing the Dyfi Valley in Mid Wales below:
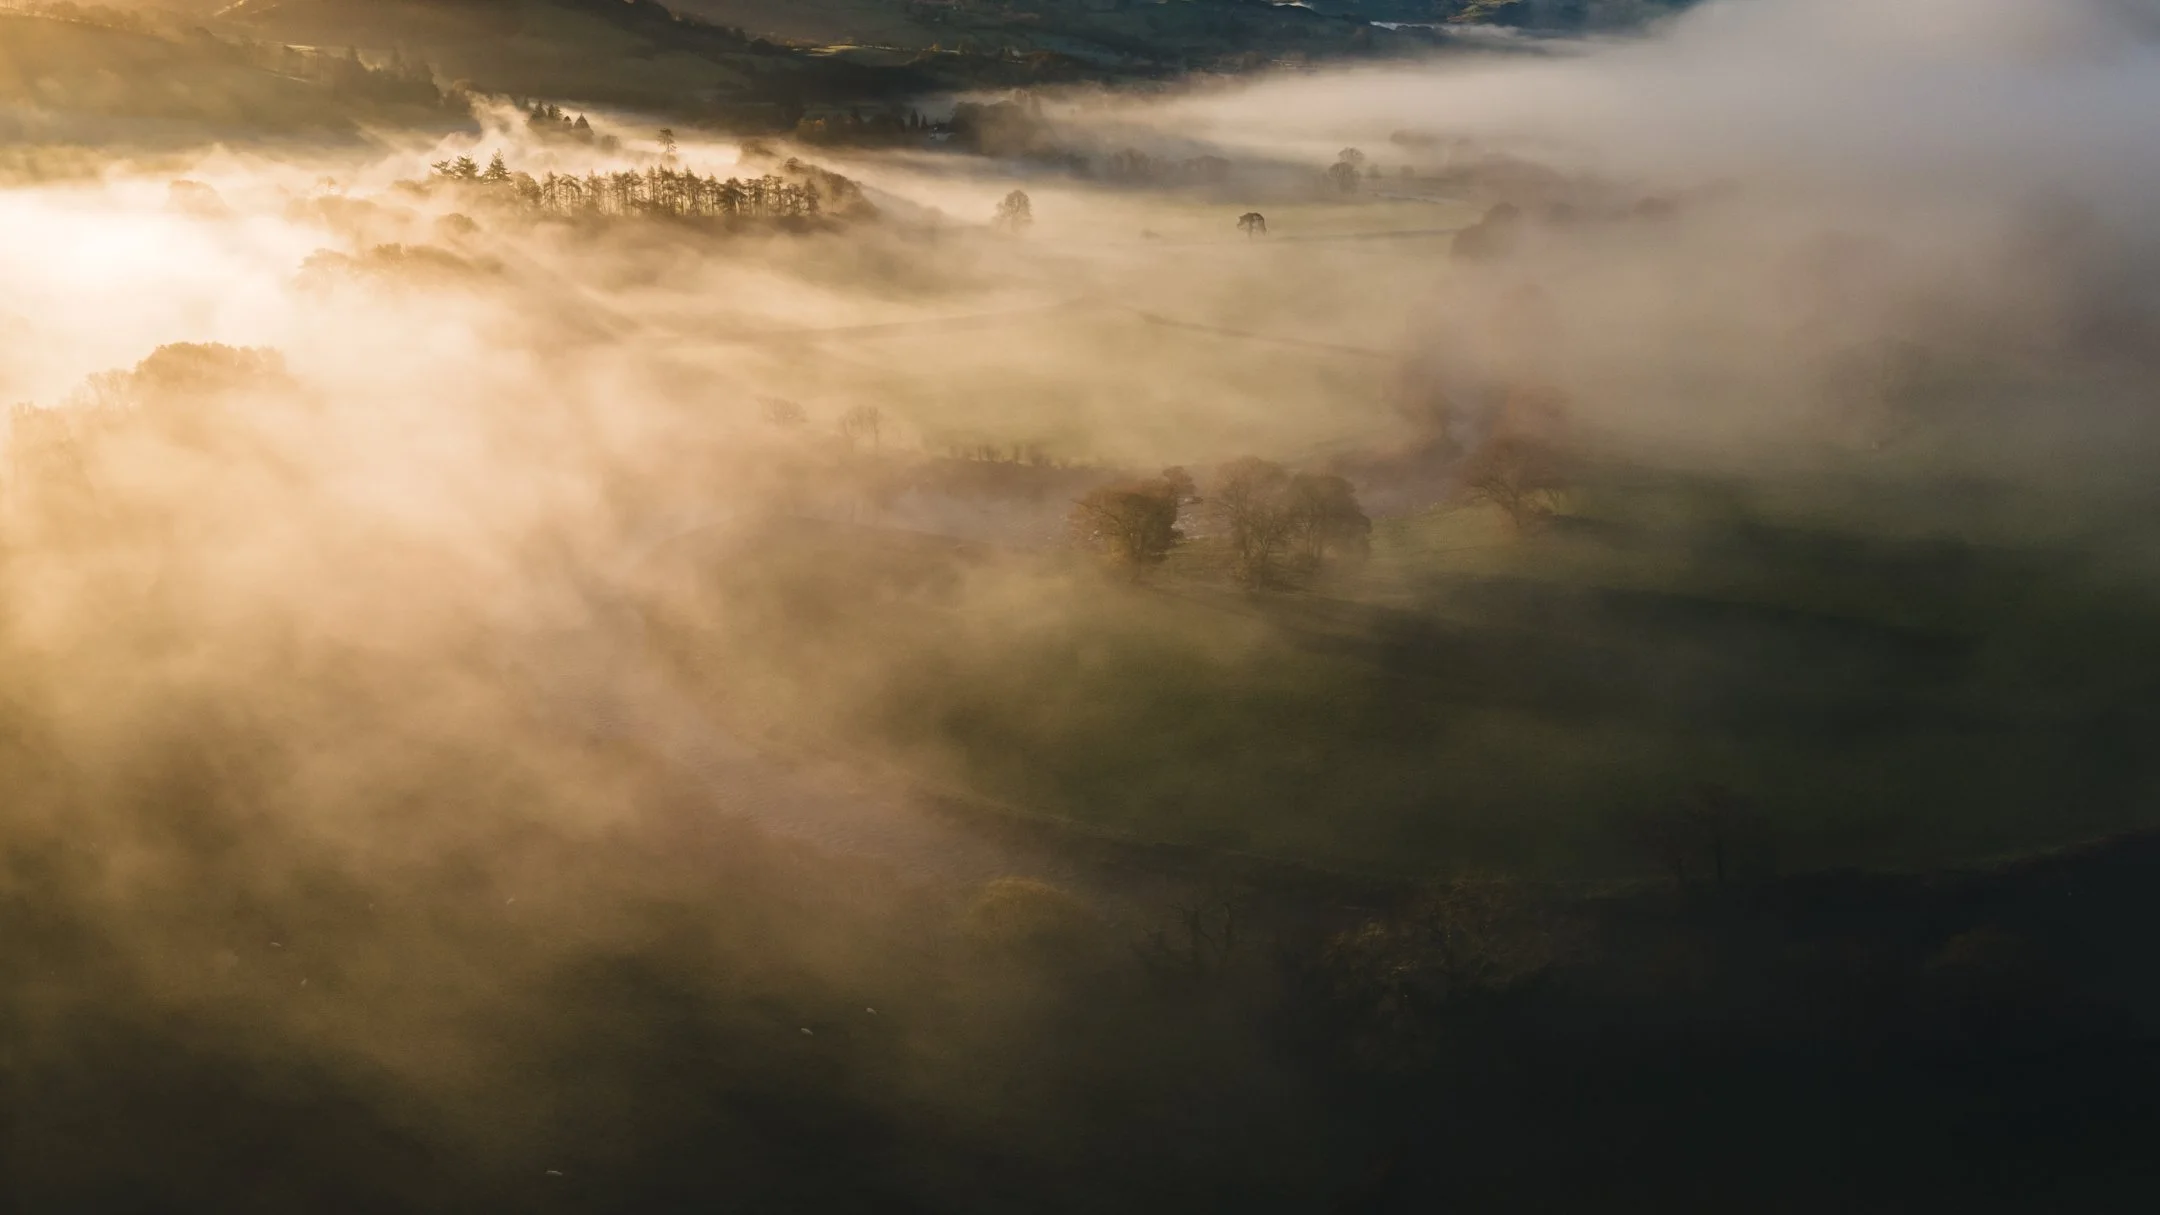
The best thing about shooting down onto the light is that you can eliminate bright skies from your photograph, meaning that the exposure is much easier to manage. I recommend taking to a local hilltop with a telephoto lens during sunrise or sunset hours to make the most of this style of light. You can scope out intimate parts of the landscape to create some compelling, atmospheric photographs.
Down Light
I have mentioned a few times in previous articles that I don’t particularly like photographing when the sun is too high in the sky. For many reasons, really, but the main ones being that there are usually too many ugly shadows cast by this kind of light, and the colours are usually too ‘punchy’ and vibrant when the sun is bright. In the instance below, however, everything came together perfectly, and I produced one of my favourite (and most impactful, I am told by many people) photographs to date.
The sun here was much higher in the sky than I would normally choose. It was late afternoon in the transitional period between winter and spring, so the light, albeit, was not too bright to use. It also helped that clouds were dancing around overhead, occasionally diffusing the sunlight, and painting glorious, dark shadows across the landscape. This photograph taught me about the power of using this kind of light; light that shines down directly from above onto the landscape that we are photographing.
So, there we have it. This was part two of my comprehensive guide to using light in landscape photography. I hope that you learnt something useful and that you now feel inspired to go out and create your own photographs using the different types of light described here in this practical article. If you would like to receive part three directly to your email inbox, consider signing up to my newsletter. I send out monthly emails with links to new writings, events, workshops, and things I have found inspiring that month.
If you’re looking for somewhere to share the results of your future photographic creations, you might like to join the Finding Light Photography Community on Facebook. It is a closed, intimate group for like-minded photographers to share, learn and grow. Occasionally, I share exclusive updates and links to articles and events which you might also find useful.

I’m Brad Carr, and here in Ten Thousand Hours, I share practical and technical articles to help you improve your landscape and nature photography. I also organise group workshops, creative retreats, and am available for private one-to-one photography tuition as well as online and in-person creative mentoring.